Welcome back to my blog beautifuls!
I recently ordered the new Laura Mercier Flawless Contouring Palette which consists of 5 cream contours & highlights. I bought mine off of the official House of Fraser website it was £35 but I was also able to get 10% off with student discount which is great! I believe this palette was released a few months back but I'm not 100% sure if it was available here in the UK straight away. It just comes in a standard plastic box as shown below. When I received it I was actually slightly disappointed because I thought it would have been a little bigger!

Just a quick note, this is NOT a review. I have used the contour & highlight shades since I bought it, but don't feel like it's been enough time for me to be able to provide an in depth review on the product (if you would like a review let me know by leaving a comment below or on my Instagram page @farzanablogs an I'll definitely write one up).
There are 3 different contour shades ranging from light to dark. There are also 2 highlight shades - I actually thought the lighter shade would be an underrate brightener in a cream form, but I was wrong. Both highlighters are to be used for a glow for the top of the cheekbones and bridge of the nose (and wherever else you want a glow). All of these are cream products, so I was really excited to try them out as I've never contoured using cream products. One thing I will say though, is that all of these are super creamy, blendable and easy to work with! I love it! As you can see from the images below, the palette comes labelled with what each compartment consists of.
 |
| Top image with flash, bottom natural lightning |
Another thing I thought was an extra special element to the palette was the little guidance cards provided on the top of the lid.
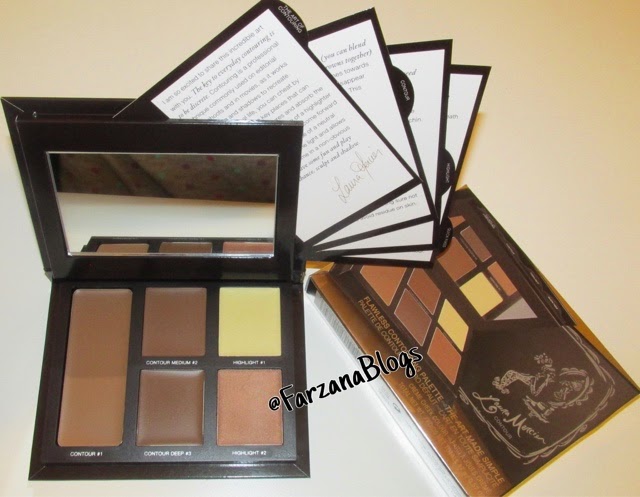
These little cards easily slide in and out, and Laura herself, has written up about the art of contouring. There are 4 cards in total, and each talks about contouring and highlighting - how to go about doing it and what areas you should focus on. She also provides some useful tips, which I think is extremely helpful. This is one of the main reasons I believe this palette is really good for those who have just begun exploring contouring and highlighting. There are step by step guides explaining what to do, so if your a beginner and are looking for something more on the high end spectrum, then definitely give this a thought. What I also love about this, is that you're able to fix and match by mixing shades together to get your desired intensity.
The fact that there are 3 different contour shades from light to dark also means this is an extremely versatile palette; so it doesn't matter if your a light, medium or dark skin tone as anyone can use this! The highlight shades have also been tailored to suit all skin tones, with a bit of both available for all skin tones. The highlight #1, the lighter one will suit light to medium tones, whereas the more bronzy highlight #2 will look beautiful on tanned to deeper skin tones!
 |
Here are swatches (above), the image on the left is under natural light, and the one on the right is with flash. Each has been labelled and applies to the flash image as well. I also thought it'd be helpful to actually see the product on my face, so below I've provided 3 images using each cream contour. From the darkest shade starting from the left, to the lightest on the right. I used a small flat foundation brush (the Real Techniques one - part of the core collection) with a slight point to it (in a slight triangular shape) and simplly carved out the places I wanted to contour - my hollows of my cheek, the sides of my nose and my forehead. I then used the Real Techniques bugging brush to blend the contour evenly out into my skin.
Tip - I found that it blended out better if I sprayed some Mac Fix+ onto my face before blending, this just added some extra moisture, allowing the cream product to blend seamlessly. I also used the BeautyBlender after and patted the contoured area to give it an airbrushed finish.
Tip - I found that it blended out better if I sprayed some Mac Fix+ onto my face before blending, this just added some extra moisture, allowing the cream product to blend seamlessly. I also used the BeautyBlender after and patted the contoured area to give it an airbrushed finish.
 |
Note: for under eye highlight I used another product an not the Larura Mercier palette.
However, I did try out the highlights. I just simply used my fingers and blended it out onto the top of my cheekbones and bridge of my nose. I preferred highlight #1, the lighter shade on my skin tone. I found that the highlight #2 didn't exactly show up that well, and neither did it provide a glow that I desired - however will look amazing on deeper skin tones!
That's all my loves. Hope the swatches helped and were useful! I do recommend this palette, however it isn't something you definitely need in your makeup collection. There are so many cheaper alternatives to cream contouring and highlighting. However if you want a palette which has everything you want in it altogether, then this is a good enough option. The only issue I have is that it doesn't have an under eye highlighter/brightener (Like the new ABH contour palettes for example).
That's all my loves. Hope the swatches helped and were useful! I do recommend this palette, however it isn't something you definitely need in your makeup collection. There are so many cheaper alternatives to cream contouring and highlighting. However if you want a palette which has everything you want in it altogether, then this is a good enough option. The only issue I have is that it doesn't have an under eye highlighter/brightener (Like the new ABH contour palettes for example).
- Farzana xo
No comments:
Post a Comment